Configuring Live Chat in ServiceDesk Plus On-Demand
To start the Live Chat configurations for your IT Service Desk, go to Admin and click ‘ Chat Settings’ under General.
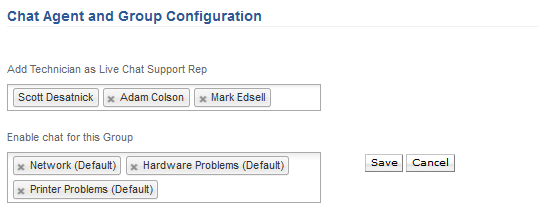
Configuring Chat Agents and Groups
If you want specific technicians to be available as Live Chat Support representative, click inside the ‘Add Technician as Live Chat Support Rep’ box and select the appropriate technicians who need to access the Live Chat feature.
To enable Live Chat for specific technician groups, click the ‘Enable chat for this Group’ box and select the appropriate groups. Please note that the technicians you have included before should be part of the Groups you include. This ensures that when the end user selects a group while initiating chat, the message gets relayed to the corresponding technician added before.
Welcome Message
You can configure the Welcome Message that end users see when they initiate chat with your team.
Chat Waiting Period
You can also configure that Chat waiting period after which end users get connected to a Live Chat technician. Just select the appropriate choice from the drop down and click ‘ Save’.
Embedding Live Chat in Customer Portal
You can embed the Live Chat float in your website or intranet portal. To do that, just copy the Float Snippet Code given and paste it in the HTML page of the destination site.
You can also customize the look and feel of the Live Chat float button by clicking on the ‘ Customize’ link. For more details refer to the documentation here.
Chat Window Configuration
You can also customize the look and feel of the Chat Window configuration button by clicking on the ‘ Customize’ link. For more details refer to the documentation here.
 Uploading ....